Despite the best efforts to keep facilities tidy, pests still get in. Proper pest control measures can prevent infestation and minimize damage.

Gaps and cracks around doors, windows, wires, and drains are prime entry points for pests. Also, keeping shrubs and other vegetation trimmed back can reduce hiding spots. Click Here to learn more.
Clutter provides a natural environment for pests like rodents and small insects. Store food in sealed containers and clean up trash regularly.
Insects are the most common pests affecting crop production. Known as the “universal” pest, they are able to adapt to a wide range of environmental conditions. There are currently more than five million extant insect species that include beetles, butterflies, moths, flies, wasps, ants, crickets, grasshoppers, dragonflies and earwigs, just to name a few.
Despite their significant contribution to plant pollination and other ecosystem services, insect pests can cause major economic losses for farmers by attacking crops. They do this by consuming or degrading a crop, reducing its market value and increasing the cost of cultivation. The global loss of agricultural production caused by insect pests is estimated to be around $70 billion per year.
While insecticides are effective at controlling pest insects, many have negative effects on beneficial insects such as predatory and parasitic species. In addition, some have the potential to disrupt or alter the gut microbiota of their hosts. The gut microbiota of insects play a critical role in their survival, including the ability to cope with stress. This is especially true for symbiotic organisms like endosymbionts. Endosymbionts can provide protection from natural enemies and toxic chemicals by deploying a series of chemical-degrading enzymes.
These symbiotic relationships are complex. For example, a pest insect may have several sets of gut symbionts to protect itself from its natural enemies or to survive in various environments. Manipulation of these symbionts is being explored in order to enhance the effectiveness of insecticides and improve pest control.
For instance, one study analyzed the effect of antibiotics on the gut microbiota of insect pests and found that the symbionts were able to detoxify several different types of pesticides. The authors suggest that symbiont manipulation could help to develop more effective pesticides, and even replace existing ones.
Lamb, who manages New York State’s Integrated Pest Management program for ornamental plants, greenhouses and nurseries, believes that interest in beneficial insects is growing among growers. This is in part due to consumer demand for less pesticide use, as well as the decreasing effectiveness of some pesticides as insects develop resistance. Another factor is the increased awareness of the negative impact of neonicotinoids on honeybees and other pollinators.
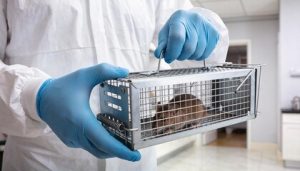
Rodents
Rodents, such as mice and rats, are a major nuisance and cause substantial damage to homes, businesses, structures and landscapes. Their chewing can damage buildings, storage items and food containers, and they may spread disease through contamination of surfaces. Additionally, rodents can gnaw through wires which can lead to fires and other dangerous consequences.
Rodents can also contaminate food by leaving droppings and urine behind on surfaces. Inhalation of these droppings and the proteins in rodent saliva can trigger allergies in sensitive individuals. These allergens can contribute to asthma attacks and exacerbate symptoms of respiratory conditions.
Rodents gain entry to buildings and other structures through holes in the walls and attics, cracks and crevices and gaps. The size of the hole required varies by species. Rats and mice can squeeze through a gap the width of a dime. Rodents can also enter through ductwork and vents.
During the Pleistocene period, rodents diversified tremendously to adapt to changing habitats. They range in size from the aquatic capybara, about the size of a pig, to desert specialists such as kangaroo rats and jerboas. Some rodents are solitary, while others live in eusocial groups such as prairie dogs and naked mole rats.
Rodents are a significant pest worldwide, causing billions of dollars in lost crops each year and carrying diseases that can be harmful to humans. These include hantavirus, leptospirosis, salmonellosis and the plague.
In addition, rodents can spread these diseases to people by direct contact or through ticks, fleas and mosquitoes that have fed on infected rodents.
There are a number of ways to prevent rodent infestations, including sealing all entry points into the home or building and removing food sources such as trash, compost and garden waste. Regularly storing garbage in sealed, airtight containers and disposing of it promptly can deter rodents. It is also important to keep grass and bushes trimmed so that they do not serve as hiding or nesting areas for rodents. Finally, snap traps and live traps can be used to catch rodents and remove them from the premises.
Bed Bugs
Bed bugs are one of the most elusive pests, and when they invade a home or business they can cause more than just physical discomfort. They also affect people psychologically, causing stress and anxiety that can be difficult to overcome. The physical symptoms of a bed bug infestation include itching, sleep disturbances and hypervigilance. These problems are compounded by the fact that people can feel helpless and hopeless when dealing with these elusive pests. Fortunately, there are professionals who specialize in bed bug control that can help people get their lives back on track.
Bed bug concerns have been on the rise, due to increased international travel and resistance to chemical insecticides. These parasitic insects are nocturnal and feed on blood, mostly from humans. They are found worldwide and can be transported on luggage, clothing, furniture and even shoes and books.
During their long coevolution with humans, bed bugs have developed resistance to several pesticides. This resistance has led to the development of management strategies that focus on non-chemical controls. While many of these are not foolproof, they can be effective in preventing and controlling bed bug infestations.
The best way to prevent a bed bug problem is to have a pest control company do a thorough inspection of your home or business. This will help you identify the signs and get the pests under control quickly. It is also important to keep your belongings away from infested areas, as they can be transferred from room to room.
It is also a good idea to declutter rooms, getting rid of unnecessary items that can provide places for bed bugs to hide. This will make it easier to spot signs of bed bug activity. If you suspect you have a bed bug infestation, call your local pest control professional right away. They can give you a free inspection and determine the most effective treatment options. They can also recommend a pesticide that will kill the pests, without harming people or pets. In addition, a pest control professional will be able to advise on how to prepare for the application of a bed bug pesticide.
Ants
Although often vilified in the garden world, ants are important ecosystem members that contribute to soil health and nutrient cycling. These insects also prey on pests and serve as a food source for other animals, including birds and mammals. With over 20,000 species worldwide and around 800 in the U.S., ants can be a challenge to control. Unless they are harming people or structures, however, it’s often best to let them be, even if you need to remove a nest.
Ants condition the soil and prey on a variety of pests, including termites, caterpillars, and squash bugs. They also disperse seeds and pollinate flowers. Some ants, however, invade houses and buildings where they build mounds, contaminate foods, and infest rooms with their stinging hairs.
Many ants, such as the Argentine ant, tend or farm several types of homopterans (sap-sucking pests like aphids and scales) because these insects produce honeydew, a sweet, sticky byproduct that ants love. In this symbiotic relationship, ants protect the homopterans from natural enemies and benefit from the free sugar in the honeydew. This can disrupt agroecosystems, however, because the ants may also eat beneficial plants and contaminate fruits and vegetables.
In addition, ants can displace or compete with native insect predators that would otherwise prey on agricultural pests. This is particularly a concern in organic and agroforestry crop systems where the ant population is larger.
To reduce ant infestations, preventive strategies include sanitation, keeping clutter, mulch, firewood and debris away from buildings, sealing cracks in walls and foundations, and regularly wiping down surfaces to remove food sources. Regularly inspecting and repairing leaky faucets, pipes and drains can also help control ant populations. Slow-acting insecticide baits are the preferred method for ant control, as they poison the entire colony without contaminating the environment. The ants pick up the bait, carry it back to their nests, and share it with other members through a process called trophallaxis. Other methods such as borax and sugar mixtures, diatomaceous earth, cinnamon and erythritol have been shown to have limited or no effectiveness.